Back to TheWorxHub for Senior Living Main Menu
Creating and Using a Project
A project is a collection of work orders. Projects can be set up for three different work needs: multiple jobs in a single location, the same job in multiple locations, and the same job on multiple assets. Projects can be created and managed from the Projects Dashboard, but a project can also be quickly created using the Global Add button.
To access the Projects Dashboard:
- Click on the Home tab, then select the Projects tab. All existing projects in the account will show here.
Multiple Jobs in a Single Location
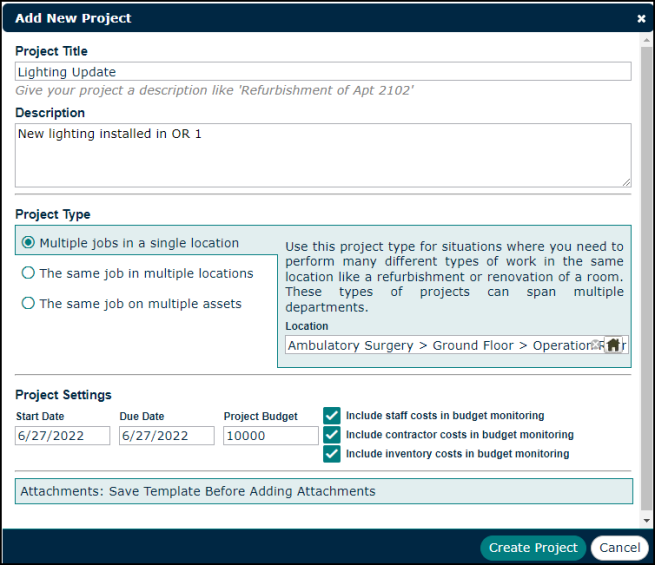
This type of project is most common when doing refurbishments or renovations. It can apply to any project that has a number of different jobs assigned to various people across multiple departments, all doing work in the same location.
- Click on the Add New Project button.
- Enter a Project Title. This is used to identify the project on the Projects Dashboard, and also appears on the individual work orders within the project.
- While a Description is not required, we recommend entering more information here to provide detail about the general requirements of the project.
- Select the Project Type of Multiple jobs in a single location.
- Use the Location search field to either type and select the name of the project location, or click the Location Picker (
 ) to select the appropriate location from the list.
 - Enter a Start Date and a Due Date for the project. These dates are important for TheWorxHub to calculate statistics on the length of time a project has been open. If a project is still open after its due date, it displays as overdue on the Projects Dashboard.
- If you will be tracking a budget, enter the budget amount in the Project Budget field and then check the boxes next to the costs you would like included in the budget.
Project Attachments
In this section, you can add any attachments from your computer, the web, or from a Dropbox account.
- Click on Attachments to expand this panel.
- Click the Add Files link.
- The File Selection window will display a list of files recently uploaded to the File Library.
Use the Search field to search for additional files.
Check the box for any file you would like to attach to the project, then click the Add Files button.
If the file does not currently exist in the library, click the +New File button to attach the file to the project.
In the window that appears, choose the source of the attachment. *Note: If a new image or document is attached to the project, it will also be uploaded to the File Library.
Select Choose File to upload a file from your computer.
Select Dropbox to link to a file in a Dropbox account.
Select URL to enter a link to a document or file on a web page.
If you have selected the wrong file, click the Remove link and repeat this process to select the correct file.
Enter a note or description of the file in the optional Notes field, then click the Add Files button.
- Click Create Project. Once your project is saved, you can begin creating work orders for it.
The Same Job in Multiple Locations
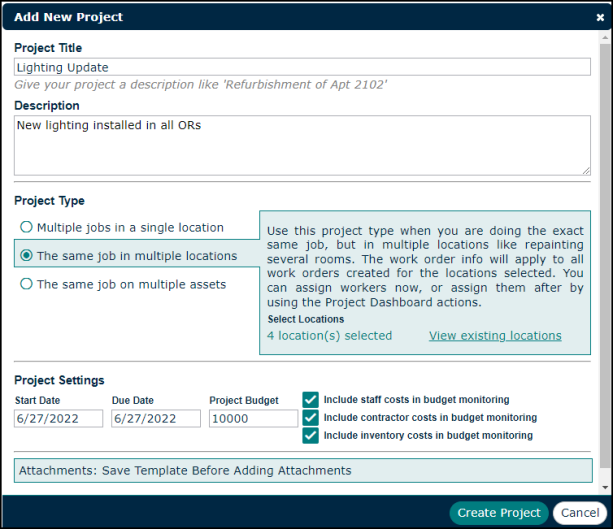
This type of project is common when performing an identical job in many different areas, such as smoke detector inspections or carpet cleaning. Rather than manually creating a new work order for each location, you can create a project and define the basic work order details once. When you create a work order for this project, TheWorxHub automatically generates a separate work order for each location.
- Click on the Add New Project button.
- Enter a Project Title. This is used to identify the project on the Projects Dashboard, and also appears on the individual work orders within the project.
- While a Description is not required, we recommend entering more information here to provide detail about the general requirements of the project.
- Select the Project Type of The same job in multiple locations.
- Click the 0 location(s) selected link to open the location list, and select the correct locations for this project. Once you select the locations, the link will update to show the number of locations you selected.
- Enter a Start Date and a Due Date for the project. These dates are important for TheWorxHub to calculate statistics on the length of time a project has been open. If a project is still open after it's due date, it displays as overdue on the Projects Dashboard.
- If you will be tracking a budget, enter the budget amount in the Project Budget field and then check the boxes next to the costs you would like included in the budget.
Project Attachments
In this section, you can add any attachments from your computer, the web, or from a Dropbox account.
- Click on Attachments to expand this panel.
- Click the Add Files link.
- The File Selection window will display a list of files recently uploaded to the File Library.
Use the Search field to search for additional files.
Check the box for any file you would like to attach to the work order, then click the Add Files button.
If the file does not currently exist in the library, click the +New File button to attach the file to the project.
In the window that appears, choose the source of the attachment. *Note: If a new image or document is attached to the project, it will also be uploaded to the File Library.
Select Choose File to upload a file from your computer.
Select Dropbox to link to a file in a Dropbox account.
Select URL to enter a link to a document or file on a web page.
If you have selected the wrong file, click the Remove link and repeat this process to select the correct file.
Enter a note or description of the file in the optional Notes field, then click the Add Files button.
Click Create Project. Once your project is saved, you can begin creating work orders for it.
The Same Job on Multiple Assets
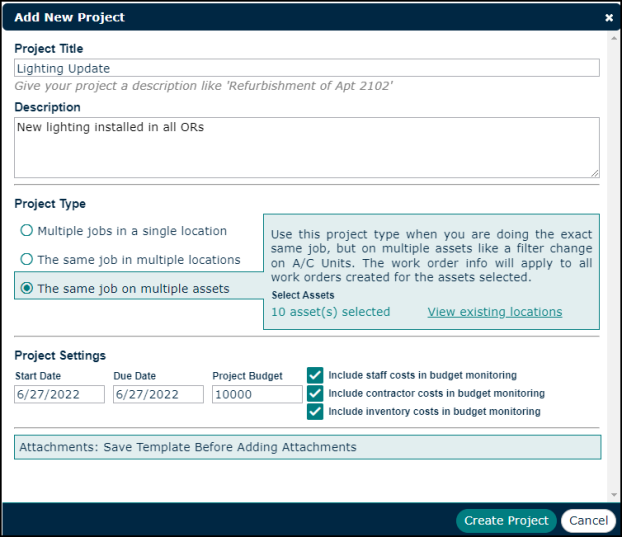
This type of project is best when performing an identical job for many different assets, such as changing A/C filters. Rather than manually creating a new work order for each asset, you can create a project and define the basic work order details once. When you create a work order for this project, TheWorxHub automatically generates a separate work order for each asset.
- Click on the Add New Project button.
- Enter a Project Title. This is used to identify the project on the Projects Dashboard, and also appears on the individual work orders within the project.
- While a Description is not required, we recommend entering more information here to provide detail about the general requirements of the project.
- Select the Project Type of The same job on multiple Assets.
- Click the 0 asset(s) selected link to open the asset list, and select the correct assets for this project. Once you select the assets, the link will update to show the number of assets you selected.
- Enter a Start Date and a Due Date for the project. These dates are important for TheWorxHub to calculate statistics on the length of time a project has been open. If a project is still open after it's due date, it displays as overdue on the Projects Dashboard.
- If you will be tracking a budget, enter the budget amount in the Project Budget field and then check the boxes next to the costs you would like included in the budget.
- Click Create Project. Once your project is saved, you can begin creating work orders for it.
Managing and Editing Projects
Once you have created a project, you will see it displayed on the Projects Dashboard. From here, you can view the status, create work orders, and manage the project.
Status Bar
The status bar on the Projects Dashboard provides a quick way to see how close to completion the project is, as well as whether the project is running on time. The bar will show in either green, yellow, or red depending on the status of the project and its associated work orders.
- Green - The project and all its associated work orders are not overdue.
- Yellow - The project is not overdue, but at least one of its associated work orders is overdue.
- Red - The project itself is overdue.
Adding a Work Order to the Project
When you first create a project, you will see a notice on the Projects Dashboard next to the project telling you that no work orders have been created yet, and the status bar will show "0 of 0 work orders complete". To add a work order to the project:
- Hover your mouse over the project record and click Add Work Order to Project.

- Fill out the work order form and click Save.
- Once created, the work orders behave like regular work orders. For example, they show up on the dashboard, and they contain the Labor, Inventory, Asset, and other work order panels.
Managing the Project
The action list that appears when you hover your mouse over the project record on the Projects Dashboard contains various options to manage your project, in addition to adding a work order.
- Complete Project - A project can be completed if all work orders within the project are ready to be quick completed. Once the project is marked complete, the project will disappear from your Projects Dashboard.
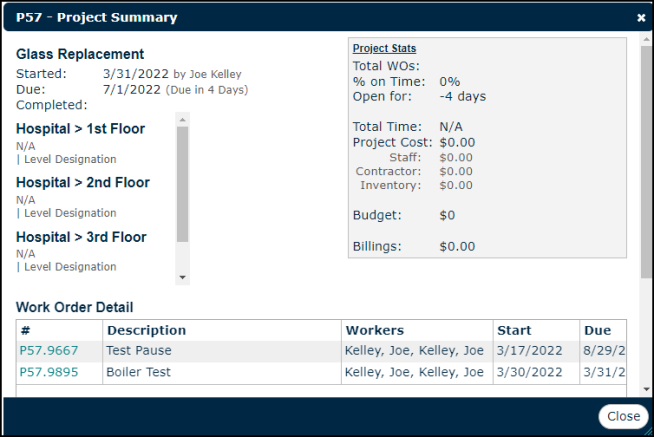
- View Project Summary - This link will open up a new window that shows an overview of your project.
- Cancel Project - A project can be cancelled if all work orders are in the status of Complete, Reject, or Cancelled.
